If you are configuring your Apple Macintosh to dual boot with Mac OS X and Windows there is a good guide on Apple’s website. However it doesn’t cover certain issues such as how to set up a third partition that can be read and written to by both Mac and Windows. And it doesn’t give help with how much space should be used for each OS.
I recently bought a 2010 MacBook Pro 13 inch, the first time I’ve ever owned a Mac. I wanted to dual boot with Windows 7 Home Premium so I bought that to.
My advice therefore relates to Mac OS X 10.6.3 Snow Leopard and Windows 7, but some of it may be applicable to other versions as well.
When going through the Boot Camp install process I chose to set my Windows 7 partition to 80GB as I wanted plenty of space for installing applications.

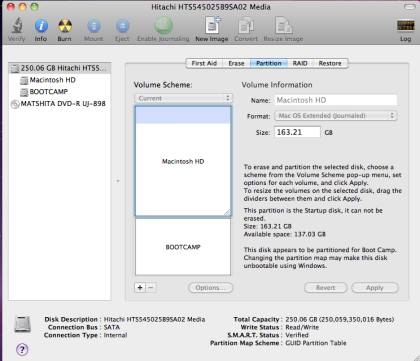
After completing the Windows 7 install I booted back into Mac OS X. I loaded up Disk Utility (in Applications / Utilities), selected the Macintosh HD partition and then resized the Mac partition to be 60GB by dragging the lower right corner of the partition. I chose this size to give me a good 100GB shared partition with the 250GB hard drive in my MacBook.

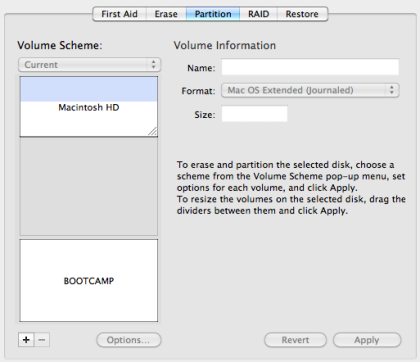
After resizing (which took less than a minute) the hard drive looked like this. You can see there is now a Mac partition, a Windows partition, and a big empty space.

Mac OS X 10.6.3 can shrink the Mac OS partition without destroying any of the drives data. However I can’t tell you if previous versions of Mac OS X support non-destructive partition shrinking.
Once you have shrunk the Mac OS partition you’ll now need to create your shared partition. If you want to be able to read and write to it from both operating systems you’ll need to set the partition type correctly.
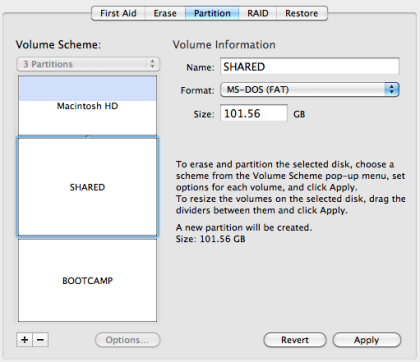
Click the plus ‘+’ to add a partition. Set it to be the maximum size for the gap in your hard drive, and set the format to be MS-DOS (FAT). The actual format used will be FAT 32 even though it doesn’t specifically say this.

After you have created your shared partition test it from both Windows and Mac OS by writing a file into it from each operating system, and then checking you can read it from the other.
MacBook Pro three partition summary
In summary you now have three partitions:
- Macintosh HD – This can be read/written to by Mac OS X. And Windows 7 can read from it. I set it to be 60GB. It is in the Mac HFS format.
- Shared – Can be read/written to by both Mac OS X and Windows 7. I set it to be 100GB. It is a Fat 32 partition.
- Bootcamp – Can be read/written to by Windows 7. And Mac OS X can read from it. I set it to be 80GB. This is an NTFS partition.
You can now use the Shared partition to store any data that you want to share between the two operating systems, such as photos, videos, music and documents.
Windows 7 and Mac OS X 10.6.3 install size
In case you are interested in how large each operating system is after install.
- Mac OS X 10.6.3 – 15GB after first boot and installing security patches.
- Windows 7 Home Premium – 11.1GB after first boot and installing security patches.
If you want to know what the Windows 7 OS is like read my review of using Windows 7 on a MacBook Pro 13 inch.
Upgrading to Lion without losing Bootcamp
I’ve successfully upgraded to Lion without losing my Bootcamp install. I’ve read that a lot of people have had problems as Lion tries to add a recovery partition which can shift your Bootcamp partition up by one. Here is my pre-Lion partition table
/dev/disk0
   #:                       TYPE NAME                    SIZE       IDENTIFIER
   0:      GUID_partition_scheme                        *250.1 GB   disk0
   1:                        EFI                         209.7 MB   disk0s1
   2:                  Apple_HFS Macintosh HD            61.8 GB    disk0s2
   3:       Microsoft Basic Data SHARED                  101.4 GB   disk0s3
   4:       Microsoft Basic Data BOOTCAMP                86.5 GB    disk0s4
Lion tries to install the recovery partition after the Mac OS X drive (in my case #2) which shifts the Bootcamp partition to #5. You can prevent the recovery partition from being created by first installing Lion on a removable USB hard disk, and then upgrading the Snow Leopard Mac install. I followed the ‘Installing Lion on an external storage device’ and then ‘Install OS X Lion’ steps on Apple’s http://support.apple.com/kb/HT4718 page.
Remember to back up first!


Very useful.
Thanks a lot!
Thanks a lot. I was a little worried about the message appears while repartitioning the Mac HD for the third partition, “This disk appears to be partitioned for Boot Camp. Changing the partition map may make this disk unbootable using Windows.”
Still I’m going to try out the same and see the result.
Regards
Hey, thanks for the 3-partition idea. I used to have dual boot in my Macbook Pro last time, but with WIndows XP which I have installed on FAT32 partition. Now Windows-7 can only be installed on NTFS causes both system not writable to each other now. I just created a small shared partition-5GB and now it works. ;)
If your Mac OS is installed with software such as Paragon NTFS, Tuxera, NTFS-3G, etc, which enable NTFS on OS X, you should be able to format the new 3rd partition as NTFS.
Thanks for that. I wish I’d read your article 2 days ago. I’ve just installed Windows with a 200Gb BOOTCAMP partition which I was hoping to resize down to a shared drive.
Now I’ll have to start all over again and do it your way.
Hmm well I tried your way and it didn’t work. After I’d created the new SHARED partition I could no longer boot to Windows :-(
Hi Matt – Does Windows start booting? Or does it not even appear on the boot screen when you hold down the key to make the boot screen appear?
If you solve your Windows booting problem do let us know the solution.
Hi
When I boot it says “No bootable device – insert boot disk and press any key”
If I hold down the Option key then only my Mac and the Mac recovery partitions appear and I can boot OK into the Mac.
I’ll keep on trying.
Excellent! This is the perfect solution and well written.
Well Matt, I experienced the same thing (shortly after my compliment post). I made the third partition, realized I wanted to name it something different, so had to delete it…but oh DANG, I think I selected the BOOT CAMP partition. So, had to get rid of shared partition. Drag the OSx partion out to full size (found this out after some trials), then start all over with nice procedure above.
BUT THEN, though I could see and read files on the Windows or Boot Camp partition, it wouldn’t boot to it. “no bootable device” error.
Solution – holding option key, booted to the Windows DVD and selected repair the start up (something like that). First boot it seemed to run off the DVD. Unplugged DVD and whamo……..I’m in like Flynn to windows!
Dang. as usual, didn’t have time for all that.
thanks again RML
Hmm. I’ve tried reinstalling Windows with Boot Camp like 6 or 7 times now, and I’ve come to the conclusion that a shared partition can’t be done with OS X Lion.
http://apple.stackexchange.com/questions/22528/macbook-air-lion-windows-7-boot-camp-shared-partition
Hi Matt, as you say it is possible that setting up a shared partition just doesn’t work with Lion. When I did this I was using Mac OS X 10.6.3 Snow Leopard.
Hi, I formatted my shared partition “ExFat”, so I don’t have the 4GB max file size limit
no!!!! dont do it like that!
if you want to change the size do it with bootcamp! it will allow you to resize by just dragging the line and it will keep it in 2 partitions.