M&M sorting machines are a popular project for people who like combining electronics, programming and machine building. I decided I’d try to make my own version but with a different approach to the majority of existing M&M (or Skittles / Smarties!) sorting machines out there.
Most of them send a single M&M down a chute to a simple colour sensor where the colour sensor will then take a second or two to figure out the colour. A servo motor will then rotate a chute that will direct the M&M into the correct pot.
My approach sends M&Ms down a chute to start with. But I don’t stop the M&M for colour recognition. Instead I use an iPhone to capture the colour of the M&M as it is in freefall. As it is still falling the iPhone talks to a Bluetooth module attached to an Arduino and that fires off the correct electro magnet controlled gate. This sends the M&M into the correct pot. Even though this is just a rough prototype it is reasonably fast because the colour recognition and path that the M&M takes down the chute is decided and determined whilst the M&M is moving under gravity. Here’s a video of the prototype:
Initial M&M sorting ideas
I’d been thinking about making an M&M sorter for a while as a fun project so I could play around with an Arduino. But I didn’t want to stop the M&M for colour recognition or use a servo motor to direct the M&M as these approaches seemed slow to me.
It was this video of a high speed coin counting machine that got me thinking about some kind of binary gate that would deflect the M&Ms into the correct place. https://www.youtube.com/watch?v=2GGKYHf8DQo. What they’ve done is really cool and impressive – the coins zoom through a sensor faster than you can see, and are nudged down the correct path by a pop up nodule.
M&M dispenser
Starting from the top of the machine I had to figure out how to ‘release’ the M&Ms one by one.
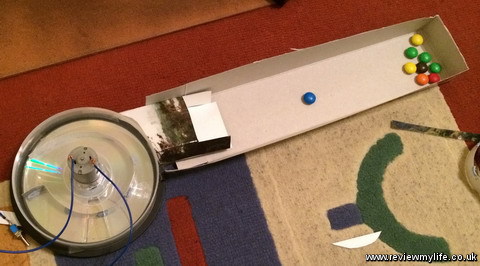
I did attempt to make some kind of spinning ‘thing’ that would shoot M&Ms down a tube in the style of the coin sorter video I saw. It did kind of shoot them down the tube, but mostly it sent the M&Ms flying all around my living room. I still don’t know if I’ve found them all!
The problem here was making the M&Ms come out one at a time (they often came out in bunches), and the fact that they flew out at different angles and velocities – this would lead to them bouncing around which would make it hard to predict where they were going to go next.
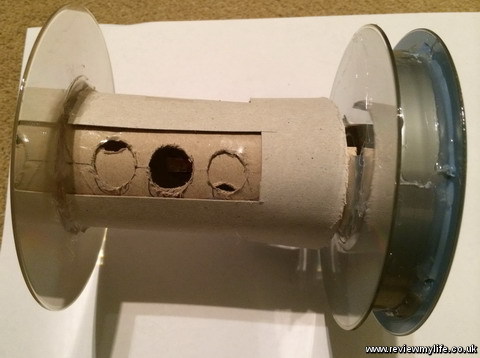
I also experimented with a cylinder that the M&Ms would go into first, and then they’d fall though the holes when the holes lined up. I realised here that the amount of torque I’d need to rotate these two tubes would be too much for my motors. Plus there was still the problem of the M&Ms falling out in twos.
I had more success with trying to replicate this tried and tested design adopted by a number of other successful M&M sorters. The M&Ms are in the container and they drop into the holes as the holes become empty.
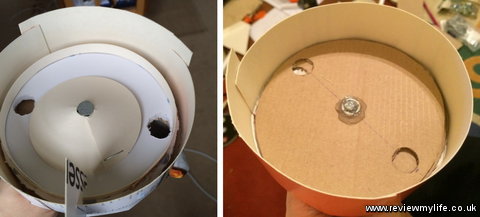
The trick to success is to ensure that the height of the hole that the M&M drops into is about the same height as the M&M. This ensures that only one M&M is in the hole at a time. And then as the M&M rotates and approaches the chute it goes under a covered area (like a bridge which touches the surface of the spinning disk) which ensures that when the M&M and the hole line up only the M&M in the hole can fall down.
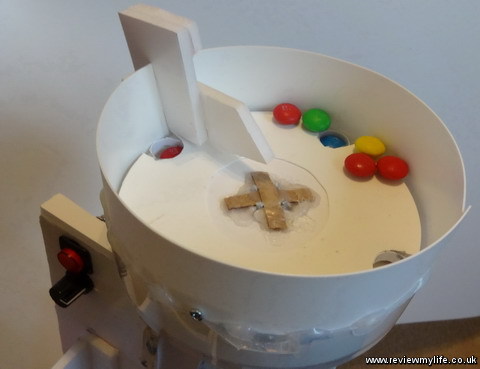
The bridge is barely visible in the photo as it is obscured by the sides – it is right at the front and is secured into place with that screw. The piece of foam board on the left perhaps helps to encourage the M&Ms into the hole but may not be necessary. I have the dispenser angled to the back so that the M&Ms fall to the edges (I want to ensure that they all go through the sorter).
Spinning the dispensor
I initially bought a 6V 500RPM motor* from Amazon, and a set of motor mounts* to attach the motor to the spinning disk.
I tried to decrease the speed to something sensible using a set of gears that I got from Maplin. However with my crude setup there was so much juddering that it prevented the M&Ms from falling smoothly.
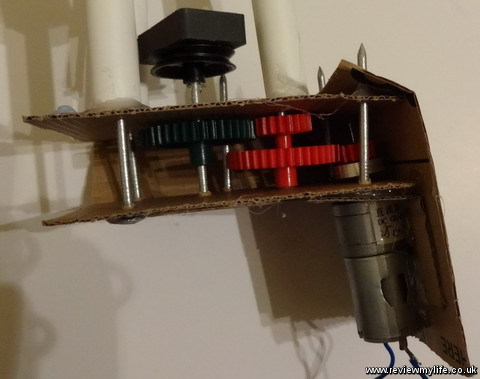
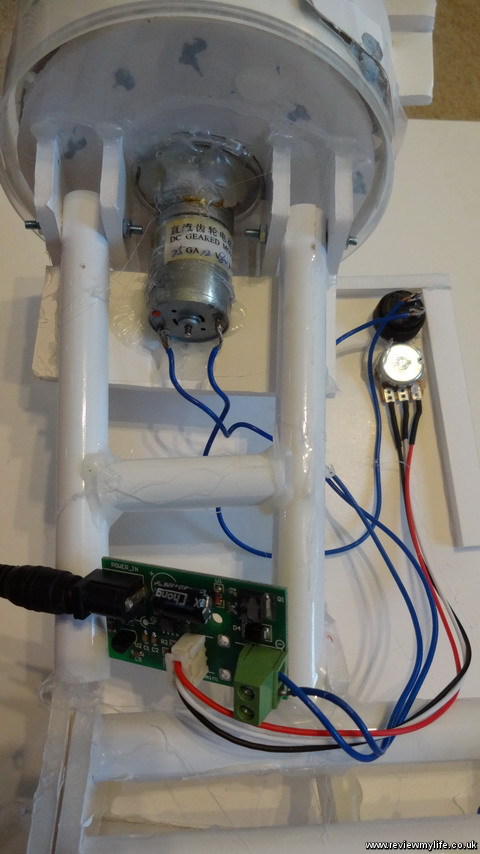
So I bought a 12V 80RPM high torque motor from eBay along with a motor speed controller which allowed me to direct drive the spinning disk. It was much smoother now, and this shows that simpler is often better.
Electro magnet gates
I’d decide to try deflecting the M&Ms down the correct chute by using electro magnets to control quick reacting gates. Electro magnets can react very fast – much faster than the slow turning of a servo.
I first bough a very small low powered electro magnet – it was useless as it was so tiny it wouldn’t have been able to move anything. So I bought a bigger 12V 2A pull magnet from eBay. This had pulling power (and goes back to its original position when the power is off because of the spring).
My first attempt was a simple ‘pull’ gate. Here the pulling of the magnet would close the gate.
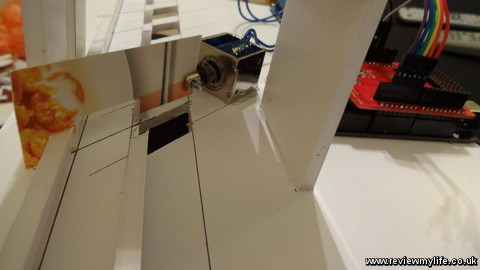
I tried doing this with both the magnet on the same level as the chute (above) and also below the chute (below).
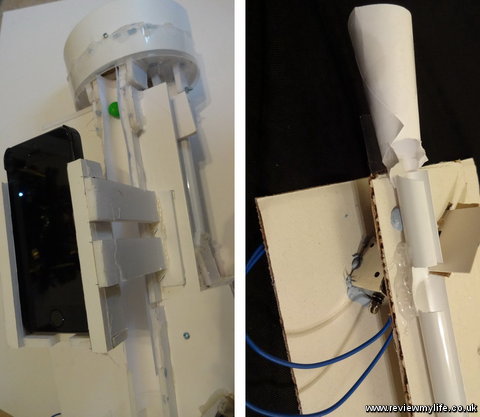
The problem was that the magnet only pulls 1cm, and taking the diagonal into account that does not fully close the chute. It worked a lot of the time, but sometimes an M&M would slip past the gate. As I couldn’t find electro magnets with a larger pull length (one with 2-3cm would have made all this much simpler!) I went for a ‘chop’ gate instead.
As the electro magnet pulls back the gate ‘chops’ downwards by means of 3 pivot points. This design turns the small amount of electro magnet movement into something much larger which can cover the entire width of the chute diagonally.
The difficulty is figuring out the exact shape and size of the moving parts. I didn’t have any scientific way of doing this – I just experimented. First using thin cereal box cardboard as shown in the image on the right. Then using rigid plastic sheet that I bought from a hobby shop. On the left is the final design I went for. These gates react extremely fast, and make quite a bang as the plastic hits the bottom of the chute.
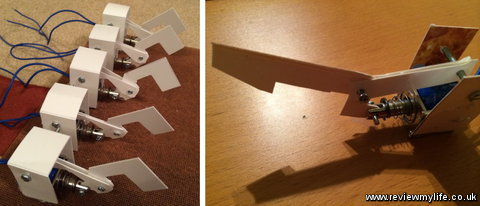
I had to make 5 of them and here is what they were looking like when glued (using a glue gun) onto the foam board. I added a bit of black tape (which was loose at the bottom) to slightly muffle the sound.
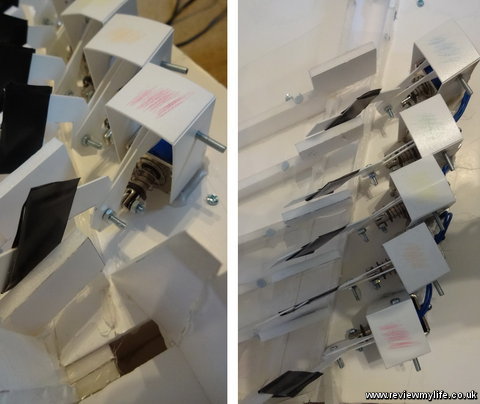
Colour sorting of M&Ms
I knew that I was going to use an Arduino to control the M&M sorter so it seemed natural to buy the Arduino compatible colour sensor that most of the other projects were using. The colour sensor is in the photo on the left and is the thing that the bright white light is coming from. What I discovered though using it was that the sensor is very slow. You have to individually sample the 4 colour sensors (red, green, blue and white) and then figure out the colour. This isn’t as easy as the sensors aren’t calibrated with each other, so you need to figure out the calibration first.

I abandoned the colour sensor as too slow (I can see why the designs that use this sensor have to stop the M&M to figure out the colour now) and decided to use an iPhone 5S camera instead. The iPhone’s camera and CPU was fast enough to film the M&M in free fall and 1) spot that there was an M&M in the field of view and 2) figure out what colour it was. The traditional cheap colour sensors available for the Arduino wouldn’t have even been able to detect that an M&M was even there as it wizzed past in freefall.
The camera is placed a bit back from the chute to give it a wider field of view. And for efficiency it is only processing the vertical strip of pixels that make up the chute. No need to process the parts of the image that the M&M will never appear in.
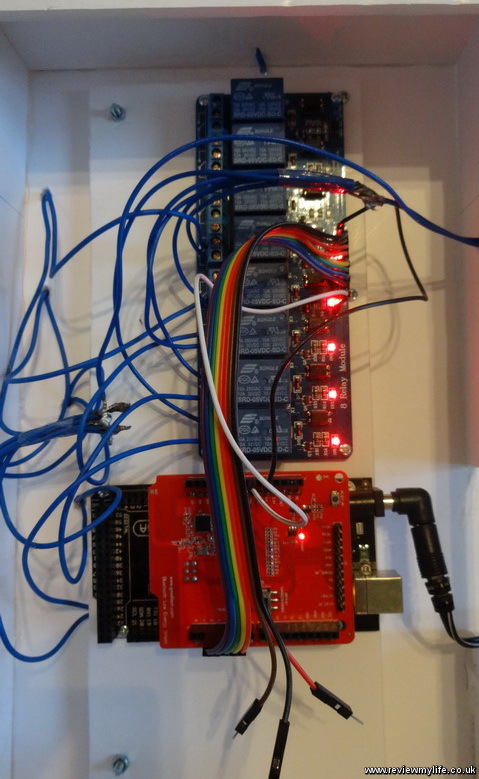
I bought a Bluetooth LE module for the Arduino (shown in red above) so that the iPhone could talk to the Arduino.
To make determining the colour more simple I flattened the colour palette of the video images as they came in. I made it so the software only saw the colours of the M&Ms that I was interested in seeing (so no shadows which were a big problem!) and everything else was white. It was then simply a matter of counting the number of coloured pixels, and then if the number was above a threshold sending the Bluetooth command to the Arduino.
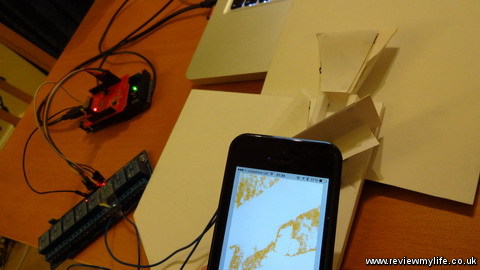
Here you can see the Bluetooth board plugged into the Arduino and wired up to the relay. Wires are then heading out of the relay to the electro magnets.
Putting the M&M machine together
Once the three key problems of the 1) M&M dispenser, 2) electro magnet gates and the 3) colour recognition were solved it is just a matter of putting it all together. This involved a lot of foam board and glue from a hot glue gun.
I used a sharp hobby knife to cut the foam board, and bought a cutting compass so that I could cut neat circles for the dispenser.
As I started testing various bits together I did find a few problems.
- The M&Ms would ricochet about as they fell down the chute, sometimes ricocheting down the wrong chute before they had reached their gate. I kind-of solved this by putting the chute at an angle so the M&Ms would be ‘encouraged’ to stay on the smooth side of the chute.
- The electro magnets could get very hot if left on. So hot in fact they could melt the glue that was holding them in place. I had to modify the software to disengage the magnets after they’d been fired (but after the M&M had hit) rather than leaving them in the engaged position.
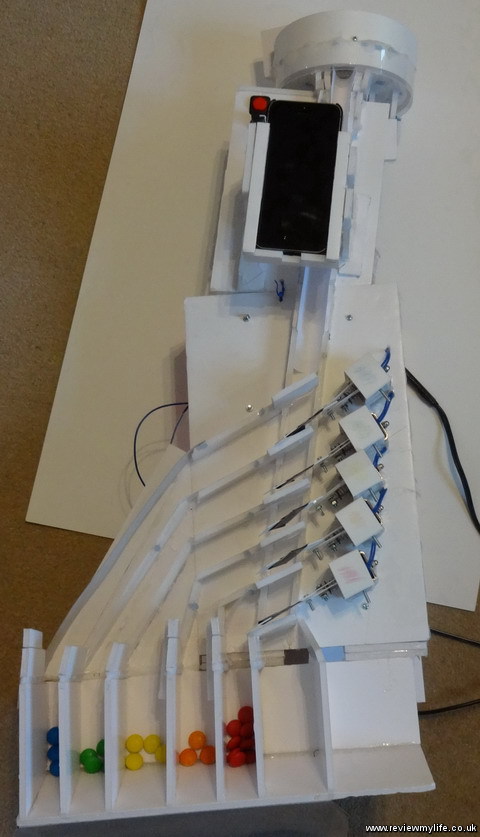
Here’s a side view of the assembled prototype.
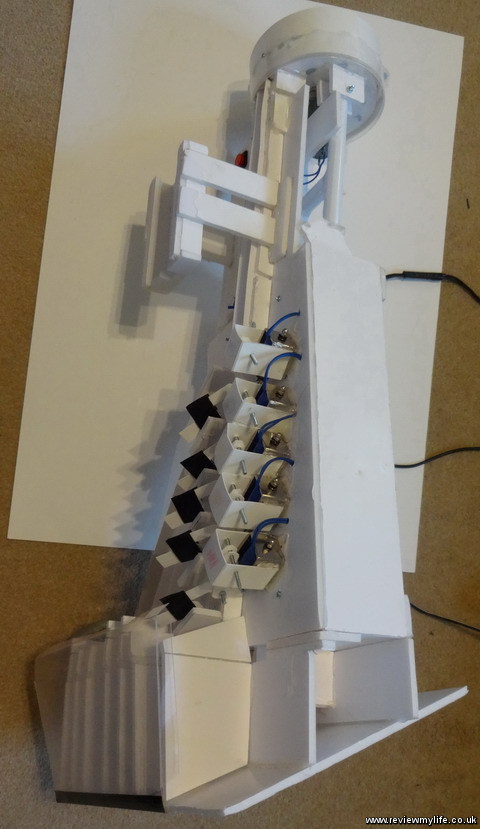
And here is the front view. It differs slightly from the version in the video as I extended the M&M ‘pots’ at the bottom to store more M&Ms and I added a button to turn the motor on/off at the top as well as a speed dial for the motor.

I have a small compilation of video snippets of earlier M&M sorting experiments on YouTube.
Future improvement ideas
I think there is a lot of potential for improving on this design. I think with some improvements the speed and accuracy of the M&M sorting could be better.
- Try to get rid of the whole iPhone / Bluetooth setup. I think to do this you could try using a Raspberry Pi with a high speed (60/120FPS) capable camera directly attached. The Pi probably has the processing power to do the image processing.
- At the moment there are three power supplies – one for the Arduino, one for the electro magnets, and one for the motor. It would be great to get everything running off a single power supply.
- More work on the image processing – you may have noticed I wasn’t sorting brown M&Ms. They are a pain to distinguish from orange and shadow. Obviously it can be done but it would need a bit more software work and perhaps some LED lighting on the chute to reduce the effect of the shadows.
- 3D printing of the parts – my prototype is very rough – it would be amazing to see it as a smooth 3D printed consumer unit.
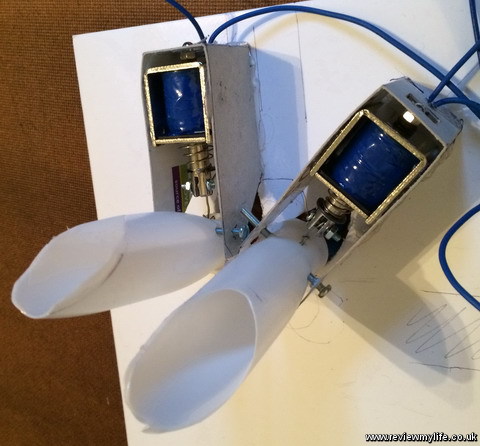
Currently the gates are in a line – this causes slight timing issues – there is less time between the camera recognising the M&M colour and the first gate needing to fire than the last gate needing to fire. NES4_Life came up with the suggestion of having all the chutes arranged in circle (like a flower) and then have the chutes move into the centre at the correct time. This would mean a fairly constant time between colour recognition and firing the electro magnet which could simplify things, especially if the speeds get higher. I did a quick test of the concept (below) and I think it has potential but I haven’t figured out exactly how to do it.
Some of the items I bought for the M&M machine
Here a partial list of what I bought – I’ll try to add more if I remember!
Bought and used on final prototype
- Arduino Mega kit* – comes with lots of extra components to play with.
- Extra jumper cables*
- 8 channel relay module*
- Arduino Bluetooth Low Energy (BLE)Shield – £18.05
- Various power supplies (which I won’t give links to as the ones I got were really dodgy ones that I’m sure weren’t properly safety tested!)
- DC 12V 2A Push Pull Type Open Frame Solenoid Electromagnet 10mm 20N 4.4LB * 5 – ~£5 each, the ones I bough are listed on eBay not but there from the same seller but are loads of other identical ones on the site
- 12V 80RPM motor from eBay – £6.30
- Motor mounts* – for attaching the motor to the spinning dispenser disk.
- PWM Pulse Width DC Motor Speed Control Controller Governor 6V-28V 3A – £5.59 from eBay
- 30cm steel ruler*
- Circle cutting compass – from any good hobby shop
- Foamboard – lots of this!
- Plastic sheet – white for the electro magnet gates
- Plastic sheet – clear to cover the M&M chutes and stop the M&Ms bouncing out on their way down to their designated pot.
Bought but not used on the final prototype
Other M&M / Skittles sorting projects
Here’s a list of other M&M sorting projects that I’m aware of (in alphabetical order). It is definitely worth looking at all of them to get inspiration for your own.
Lego Mindstorms M&M Sorting Machine
Lego Mindstorms NXT – The M&M Dispencer
m&m’s sorter
m&m sorter #3, take two
M&M sorter
M&M Sorter (da Vinci’s Workshop)
Skittles Sorting Machine 3
Sorting Machine – Skittles and M&M’s
And there’s even more if you search on YouTube!
Affiliate disclosure: Links with a * are affiliate links. As a member of a number of affiliate programmes I earn from qualifying purchases.


Really, the far more noble project would be to sort the M&Ms from trail mix. That’s what I’m hoping for.
Just wanted to say congratulations & great to see GBP £ where I was expecting $ in the shopping list!
So ratchet but effective. Now solve the Coral Castle.
Well done for the write-up mate! Great project indeed. Looking forward to seeing this evolve further.
You could have a single chute/tube with the bins around it in a circle. The electromagnets are all attached to the chute and arranged around it such that when one pulls, the chute bends towards the proper bin.
If the color isn’t recognized, the chute doesn’t move and it just falls down the center into a miscellaneous bin.
At the end, ALL the sorted bins then dump into miscellaneous and an auger pulls them back to the top to be sorted again!
You should sell these. I would pay a lot
Great project ! Here you’re using a bluetooth board plugged to your Arduino. But why not link your computer to your Arduino ? With this solution, you can exchange even more information and, for example, make a specific sort (combine red and blue in one box, etc).
Great job.
Great work! Is the bottom electromagnetic gate necessary? Seems the foam core would direct anything not already routed above to “default” to the red chute.
Hi!
I love your project.
What type of LCD did you use?
you can cut the cost down by at least 75%if you but the parts directly from China
Congratulations.
Excellent piece of “industrial automation”
amazing. I hope that he will be hire by some great tech company because he deserves it. Engineers would have asked £ 10,000 for this :p
Does it work with Smarties?
Very nicely done. This uses a lot of similar ideas we use in factory automated sortation systems. We use PLCs and high speed color sensors but the concepts are the same.
Be sure to submit a resume to Rockwell Automation if you are looking for a career doing this kind of work.
It’s amazing. Congratulations.
Don’t know whether you realize but there is some very expensive plant out there doing the same job your colour sorter is doing – especially in processing grain and lentils etc eg http://www.world-grain.com/Supplier%20Info/Technical%20Papers/2014/3/New%20color%20sorting%20technology.aspx?cck=1
Brockwell Bake is a small voluntary association working on bringing some old wheats back into cultivation because they may be better for organic farmers and also more digestible than modern wheat.
We have one wheat line which is a recent cross between old varieties to produce a “Purple Naked Spelt” viz http://www.brockwell-bake.org.uk/gallery_s.php?page=10&search=spelt&gall=0 but the outcome is still evolving. We want to be able to sort the grain from plants that retain the purple colour and those that don’t. We don’t have the money to buy the plant obviously or even hire the mobile grain colour sorters that do exist so wondering if you are interested in adapting from M&M to grain?
Hi, i liked your project and i would like to do something similar as my school final project it as my final project on school, do you have any mail where i could contact you? I would like to ask you some questions
please could you send me the code for processing images?
Hi! Congractulations.. the project is very good. Can you send the code or App that process the video? Thanks a lot!
This is inspiring, feature advancement using Raspberry PI and OpenCV will boost performance.
I am working on something similar but for grain seed sorting.